Emulation of a Kawai K1 as VSTi plugin

Introduction

The Kawai K1 is a digital synthesizer made in 1988. It has been used in numerous music productions in the 90s and is even used nowadays by some groups because of its unique sound.

I recently needed some sounds from the K1 family (K1, K1r, K1m, PHm), but for these devices, samples are quite limiting as some of the presets are heavily modulated and depend on things like velocity, aftertouch and so on.

While searching for samples, I stumbled upon a blog post by Chvad, who released the entire set of the K1’s internal 256 waveforms. Part of this set are all the famous PCM samples that I still remember, like the choir, the pan flute and others.
But most of them are not really usable without further editing. Although the K1 is a PCM based sample playback machine (and yes, it is the only form of synthesis its actually doing), Kawais approach for most sounds was the following: Most PCM samples are only very small snippets, they represent only a single cycle of a waveform. They contain the root frequency plus up to 128 harmonics. If this snipped is looped, it creates the sound of a bell, a basic sine wave or others while saving a lot of ROM size, as memory was

I played around with these single cycle waves and was able to create some of the K1 sounds in a sampler. Some of the samples provided by Chvad needed further editing and, due to the frequency they have been sampled at, lacked the high frequencies when playing low Midi note numbers.

This was the first time I thought about if it was possible to emulate a K1 by recreating its internal synthesis. I had this idea in mind for some time, but never had the time to start. During Corona, this idea came back to live again and I started with further research and eventually started this project.

Of course, I know that there are tons of devices & VST plugins out there that have much higher capabilities, may sound better and so on. But as a teenager, the K1 was always one of the devices that I wanted to have, but never bought before I sold all my hardware many years later and moved over to use VST plugins instead.

Reading K1 Sysex data

Luckily, Kawai scanned all their old manuals and put them up on the Internet. This includes the manual itself, the list of wave forms including pictures and the midi implementation. Furthermore, the factory presets and all presets that came on cards are available as sysex files, so that seemed to be a good start.

Reading the sysex files was pretty straightforward. Although the documentation contains some bugs, I quickly figured out the parameters and a comparison between my data structures with a demo version of MidiQuest proved that reading the data is working correctly.

The K1 synthesis engine

The K1 works in the following way:

The K1 features 256 8-bit PCM waveforms. 204 of them are the previously mentioned single cycle waves, the remaining ones are regular PCM samples and feature sounds like choir, flutes, drums, FX and others.

A sound, in K1 terminology they’re called Singles, can be created from up to four so-called Sources. For each source, a arbitrary waveform can be selected. Furthermore, each source has an DADSR envelope (an ADSR with delay), own settings for coarse & fine tune, keytracking can be toggled and there are plenty of other modulation capabilities, both for frequency and amplitude.

It features a single LFO that can either be triangle, square, saw or random that can modulate the frequency of the sources. It is mostly used in combination with the modulation wheel to drive the vibrato function, but also to create surprising modulation effects.

In contrast to the more pricier models a this time, there is neither any filter nor an effects section.

Emulating the first factory patch ‚Aah‘

After I have been able to read presets from sysex files, I’ve set up a VST project and started to emulate it by simply playing back Chvad’s wave files when a midi note is pressed. This turned out to be fairly easy and worked well.

I then added more features to make the first factory preset, called Ahh, playable.

It’s made up of four sources where two of them each have the same waveform with a small detune. After adding support for coarse & fine tune, it sounded better.

I then added support for envelopes by copying some source code from my Heat Synthesizer project and dealt with voice management to make it become a real synth.

I roughly estimated the envelope parameters conversion to make it sound like in this video, which helped me a lot during the first days:

Great success! That sounded like a real K1!

I was surprised how easy it was and continued to implement more features.

Vibrato & Pitch Bend

One of the first things I wanted to add is support for pitch bend and vibrato.

Pitch bend was fairly easy as it was well documented. There is a bend range parameter and the Midi implementation states that 8 bits of the incoming midi data are used. For now, I used the full range of 14 bits for more precision, but I haven’t decided yet if I keep it like this or go down to 8 bits again to match the original machine.

In contrast, implementing the vibrato was much more complex than I initially thought. There is no documentation in the manual that explains the vibrato speed, other than stating that 0 is slowest while 50 is fastest. I roughly estimated the vibrato speed again by listening to the Youtube video that I linked above to make it sound right.

Issues

While I was happy that the first factory preset sounded good, others were completely off. The second factory preset 6 String revealed that my rough envelope estimation was okay for just one preset. The decay & release times were way too long for this one so I reworked my formula and tried to match the original K1 even closer.
But another thing turned out to be problematic: The quality of the sampled waveforms. Especially for 6 String, playing lower notes showed that a lot of upper frequencies are missing. I found a second set of waveforms and played around with them, some of them are much better as they have been sampled at a lower midi note.
Factory preset 5, called Visitors, is the first one that makes heavy use of the LFO to create effects. The LFO timing was a problematic issue for a longer time.

I’m going to post more updates, including audio examples, about the progress and K1 internals in the future. Meanwhile, I luckily got a real K1 and I started to measure a lot of things to make my VST match the real device. Stay tuned & thanks for reading!

Blinds Sun Protection control with Node-RED

After I’ve seen various questions in Facebook groups & forums about how to control your blinds and how to do a proper sun protection, I thought I’d share how I’ve done it.

The devices & programs I use to do this are:

  • Blinds that I can control with values from 0 (completely closed) to 100 (completely open)
  • Lux-Sensors (Fibaro FGMS)
  • Mosquitto MQTT Server
  • Node-RED for the logic

Easy Way: Sun Protection by using the LUX-Value only (not sufficient)

Sun Protection by using the brightness is the most common way, many manufacturers sell ready-to-use sets or sell brightness sensors as an extra.

The usual logic is that blinds are partially closed whenever the brightness has exceeded a certain threshold and opened again if the brightness has lowered. In Node-RED, this looks like this:

In the example above, an MQTT input is used to determine the current brightness. A Switch node decides whether it is too bright or not, followed by two change nodes to set the blind position value to either 100 (completely opened) or 30 (sun protection), that is then sent via MQTT to the blind.

Problems

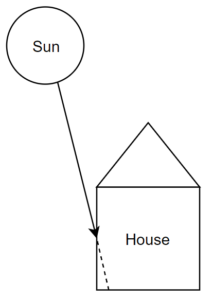
The problem with this approach is that it will always enter sun protection mode, even if the sun is located at a very steep angle. So even if nearly no direct sun light enters the window, the brightness sensor will fire and the blinds are closed.

The opposite problem might occur, too. During sun set, the sun might lighten up your living room drastically and will dazzle people, but as the suns brightness is quite low already, the brightness sensor doesn’t exceed the threshold anymore and no sun protection is being activated.

Better: Sun Protection by including the sun position relative to the house

What I did to solve the above mentioned problems, I took the sun position relative to my home into account.

Retrieving the sun position / direction

To get the sun position, there is a nice Node-RED module called astrodata:
https://flows.nodered.org/node/node-red-contrib-astrodata

It offers a node called sunposition. To make it work, you need to enter your geolocation as latitude/longitude and height in meters. After doing that, you can inject any kind of data to make the node output the sun position as azimuth/altitude:

This node then outputs:

msg.sunAzimut
msg.sunAltitude
Retrieving the home position / direction

As we now know the direction of the sun, we need the home direction to have something we can compare against to.

The home direction can be extracted by using Google Maps:

  • Switch to Satellite View
  • Tilt the view and rotate it until you look into the direction of your front or garden (or whatever direction has windows)
  • Look at / remember / copy the URL that is displayed in your browser bar to extract the information we need

Below is an example screenshot and the address that is displayed in the browser:

View rotated to look into the direction of the garden.
https://www.google.de/maps/@??.???????,?.??????,62a,35y,335.63h,56.76t/data=!3m1!1e3

It is important to note down the number that is displayed to the left of the h character. This is the angle at which we’re looking at, in this case it is 335.63 degrees.

You can either repeat the above steps to find the azimuth for any other window of your house or calculate them. In the above example, to find out the angle of the front windows, we just need to subtract 180° from the garden value.

Calculating the amount of sun irradiation into the building

Now that we’ve got the current sun direction and the direction of our windows, which are constant, we can calculate the amount of sun irradiation into these windows.

To do this, we convert the azimuth / altitude values for both the sun and our windows into three dimensional vectors. A 3D vector is has an x,y and z coordinate and defines a direction in three-dimensional space.

The formula to do this is not that hard and can be done like this:

function toVector(_altitude, _azimuth)
{
  _altitude *= Math.PI / 180.0;
  _azimuth *= Math.PI / 180.0;
  var z = Math.sin(_altitude);
  var hyp = Math.cos(_altitude);
  var y = hyp * Math.cos(_azimuth);
  var x = hyp * Math.sin(_azimuth);
  return {x:x, y:y, z:z};
}

In Node-RED, add this to a function node of your choice and call this function with the appropriate values. In my case, I added this to a larger function, but if you want to split it up a little bit more, that’s easily possible of course.

To create a single node that accepts the output of the sunposition node, as mentioned above, the function would look like this:

function toVector(_altitude, _azimuth)
{
  _altitude *= Math.PI / 180.0;
  _azimuth *= Math.PI / 180.0;
  var z = Math.sin(_altitude);
  var hyp = Math.cos(_altitude);
  var y = hyp * Math.cos(_azimuth);
  var x = hyp * Math.sin(_azimuth);
  return {x:x, y:y, z:z};
}

return toVector(msg.sunAltitude, msg.sunAzimut);

What about the home direction? So far, we only discussed how to get the azimuth, but what about the altitude? It’s easy, because the home is completely horizontal, the altitude is just zero ?

The same function as above can be used to convert the direction of your home/window to a vector, too.

Once we have both as a vector, we have to calculate how much they’re matching up. This is where a common 3D function, the so called Dot Product comes into place.

The Dot Product returns how much two vectors match the same direction. The result is a factor between +1 (two vectors point into the same direction) and -1 (two vectors point in opposite directions).

In Node-RED, the dot product can be implemented like this:

function dot(_a, _b)
{
  return _a.x * _b.x + _a.y * _b.y + _a.z * _b.z;
}

Now if you input the vector of the sun and the vector of a window, you’ve got a sun irradiation factor for this window.

Combining Window Irradiation Factor and Brightness

If you use only the window irradiation factor to control your blind, the blind will be in sun protection mode even if it’s cloudy. To overcome this, we combine the irradiation factor with the brightness value as reported by a brightness sensor.

In my case, the sensors report the brightness as Lux. I have one sensor in the garden, another one at the front. We can combine the brightness value with the irradiation factor by just multiplying them together:

var frontSunIntensity = frontIrradiation * frontBrightness

This causes the brightness value to be scaled by the irradiation factor. For example, if the brightness sensor reports 10000 Lux, but the irradiation is only 0,5, the final value would be 5000.

Setting a blind to sun protection mode now requires a simple threshold function as above, except that we do not use the brightness value as source, but except we use our overall sun intensity value.

I use a threshold of 3500, but this depends on your location and the used sensors. Best is to add a dashboard element to Node-RED to be able to adjust this threshold.

Conclusion

By combining the brightness and the irradiation factor, we solve several problems.

  • On a cloudy day, sun protection is not enabled, as it is done in most simple setups
  • If the sun angle is very steep, sun protection is no longer enabled by accident
  • During sun set & sun rise, sun protection is enabled although it is not as bright as during noon

I use this system for over a year now and didn’t experience any situation yet where sun protection was inappropriate or missing.

I added one further feature to prevent erratic behaviour on a day where smaller clouds frequently cover the sun: You might consider adding some delay nodes so that the blinds are not constantly moving up and down all the time. In my case, sun protection is enabled for at least 30 minutes.

Hope this article has shed some light ? into how a possible sun protection can be achieved. If you like it, feel free to share!

Node-RED flow

Update 2021:

I’ve got several requests to share the Node-RED flow. This is not that easy as the input for the brightness may come from plenty of devices. Below is the „interesting“ part, the sun position & factor calculation, the output is sent to an MQTT server. This can be used to further processing.

The only thing that is missing is a factor with the overall brightness and a threshold function to control the blinds.

[{"id":"8c80c880.3930f8","type":"tab","label":"SunIntensity","disabled":false,"info":""},{"id":"b419da0c.d06468","type":"astrodata sunposition","z":"8c80c880.3930f8","name":"","lon":"6.5","lat":"52","height":"20","x":278,"y":155,"wires":[["fdd7a6d9.297968","572aef1f.ea47a","48a47bc5.6a2a54"]]},{"id":"255d9cf1.d40654","type":"inject","z":"8c80c880.3930f8","name":"5min","topic":"","payload":"","payloadType":"date","repeat":"300","crontab":"","once":false,"onceDelay":0.1,"x":116.87948608398438,"y":146.32626342773438,"wires":[["b419da0c.d06468"]]},{"id":"fdd7a6d9.297968","type":"change","z":"8c80c880.3930f8","name":"sunAzimut","rules":[{"t":"set","p":"payload","pt":"msg","to":"sunAzimut","tot":"msg"},{"t":"set","p":"topic","pt":"msg","to":"Azimuth","tot":"str"}],"action":"","property":"","from":"","to":"","reg":false,"x":491.2900085449219,"y":88.54107761383057,"wires":[["b965ee6a.8601b"]]},{"id":"572aef1f.ea47a","type":"change","z":"8c80c880.3930f8","name":"sunAltitude","rules":[{"t":"set","p":"payload","pt":"msg","to":"sunAltitude","tot":"msg"},{"t":"set","p":"topic","pt":"msg","to":"Altitude","tot":"str"}],"action":"","property":"","from":"","to":"","reg":false,"x":491.8013000488281,"y":128.03579807281494,"wires":[["26982780.603a68"]]},{"id":"48a47bc5.6a2a54","type":"function","z":"8c80c880.3930f8","name":"sun intensity","func":"var sunAltitude = msg.sunAltitude;\nvar sunAzimuth = msg.sunAzimut;\n\n// Define azimuth of garden & front, extracted from Google Maps\n\nvar gardenAzimuth = 140.0;\nvar frontAzimuth = gardenAzimuth + 180.0;\n\n// convert polar coordinates to a three-dimensional vector\n\nfunction toVector(_altitude, _azimuth)\n{\n    _altitude *= Math.PI / 180.0;\n    _azimuth *= Math.PI / 180.0;\n\n    var y = Math.sin(_altitude);\n    var hyp = Math.cos(_altitude);\n    var x = hyp * Math.sin(_azimuth);\n    var z = hyp * Math.cos(_azimuth);\n\n    return {x:x, y:y, z:z};\n}\n\n// three-dimensional dot product of two vectors. Returns a value between -1 and +1\n// +1 means that they point into the same direction\n// -1 means that they point in opposite directions\n\nfunction dot(_a, _b)\n{\n    return _a.x * _b.x + _a.y * _b.y + _a.z * _b.z;\n}\n\nvar vecSun = toVector(sunAltitude, sunAzimuth);\n\nvar vecFront = toVector(0.0, frontAzimuth);\nvar vecGarden = toVector(0.0, gardenAzimuth);\n\nvar factorFront = dot(vecSun, vecFront);\nvar factorGarden = dot(vecSun, vecGarden);\n\nreturn [\n    {payload:factorFront, topic:\"factorFront\"},\n    {payload:factorGarden, topic:\"factorGarden\"},\n];\n","outputs":2,"noerr":0,"x":558.8794860839844,"y":193.32626342773438,"wires":[["8c30a028.0e1ce"],["974bc27c.2ed4e"]]},{"id":"e4c249f6.b4e3a8","type":"mqtt out","z":"8c80c880.3930f8","name":"","topic":"weather/sunintensitygarden","qos":"","retain":"true","broker":"bd614572.ba1df8","x":949.8795166015625,"y":224.32626342773438,"wires":[]},{"id":"e2e8d69d.3a7c68","type":"mqtt out","z":"8c80c880.3930f8","name":"","topic":"weather/sunintensityfront","qos":"","retain":"true","broker":"bd614572.ba1df8","x":940.8795166015625,"y":176.32626342773438,"wires":[]},{"id":"ac44f755.309128","type":"mqtt out","z":"8c80c880.3930f8","name":"","topic":"weather/sunazimuth","qos":"","retain":"true","broker":"bd614572.ba1df8","x":801.8794860839844,"y":68.32626438140869,"wires":[]},{"id":"203eecde.0595e4","type":"mqtt out","z":"8c80c880.3930f8","name":"","topic":"weather/sunaltitude","qos":"","retain":"true","broker":"bd614572.ba1df8","x":793.8794860839844,"y":115.32626438140869,"wires":[]},{"id":"b965ee6a.8601b","type":"rbe","z":"8c80c880.3930f8","name":"","func":"rbe","gap":"","start":"","inout":"out","property":"payload","x":635.8794860839844,"y":73.32284641265869,"wires":[["ac44f755.309128"]]},{"id":"26982780.603a68","type":"rbe","z":"8c80c880.3930f8","name":"","func":"rbe","gap":"","start":"","inout":"out","property":"payload","x":636.8794860839844,"y":116.32284641265869,"wires":[["203eecde.0595e4"]]},{"id":"8c30a028.0e1ce","type":"rbe","z":"8c80c880.3930f8","name":"","func":"rbe","gap":"","start":"","inout":"out","property":"payload","x":758.8795166015625,"y":180.32284545898438,"wires":[["e2e8d69d.3a7c68"]]},{"id":"974bc27c.2ed4e","type":"rbe","z":"8c80c880.3930f8","name":"","func":"rbe","gap":"","start":"","inout":"out","property":"payload","x":757.8795166015625,"y":219.32284545898438,"wires":[["e4c249f6.b4e3a8"]]},{"id":"bd614572.ba1df8","type":"mqtt-broker","z":"","name":"mosquitto","broker":"mqtt","port":"1883","clientid":"nodered","usetls":false,"compatmode":true,"keepalive":"60","cleansession":true,"birthTopic":"","birthQos":"0","birthPayload":"","closeTopic":"","closeQos":"0","closePayload":"","willTopic":"","willQos":"0","willPayload":""}]

Fibaro Double Switch 2 FGS-223 und OpenHAB

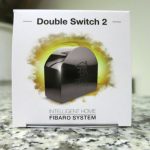
Es war soweit, zwei neue Fibaro Double Switch 2 FGS-223 sind eingetroffen. Im Vergleich zum Vorgängermodell, dem FGS-222 Double Relay Switch 2 x 1,5KW bietet der Double Switch 2 einige interessante Neuerungen:

  • Lastmessung: Momentanverbrauch (Watt) und Gesamtverbrauch (KWh)
  • Z-Wave Protokoll Generation 5 / Z-Wave Plus Support
  • Für Fibaro HCL/HC2 Nutzer interessant: Szenensteuerung
  • Senden von Überhitzungs-Alarm

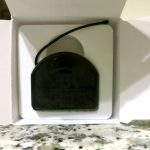
Der Aktor kam in dem von Fibaro gewohnten Karton, neben dem Gerät selbst liegen ihm auch wieder Anleitungen in allen gängigen Sprachen in Form von Faltblättern bei.
Nicht Teil des Geräts, aber wie ich finde durchaus mal eine Erwähnung wert: Inzwischen gibt es die PDF-Handbücher für alle neueren Geräte, zumindest in der englischen Version, nun in einem vernünftigen vertikalen Layout mit Seitennummerierung, das macht das Lesen am PC/Tablet/Handy deutlich angenehmer.
Handbuch als PDF (englisch):

http://manuals.fibaro.com/content/manuals/en/FGS-2×3/FGS-2×3-EN-T-v1.0.pdf

Zum Vergrößern klicken:

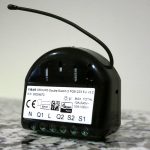
Das Gerücht, das Gerät sei kleiner geworden als seine Vorgänger, kann ich nicht bestätigen. Ich habe gerade zwar keinen FGS-222 zum Größenvergleich zur Hand, aber die Vorgänger habe ich mit identischer Größe in Erinnerung.

Anschlussterminal

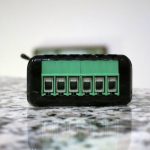
Wie man den Bildern entnehmen kann, hat sich das Anschluss-Terminal verändert: Zunächst ist die Phase L nun zwischen die beiden Relais-Ausgänge gewandert, beim Vorgänger befand sich die Phase noch neben dem Neutralleiter N.
Zudem ist der zweite Eingang IN weggefallen. Die Phase wird nun sowohl für die Versorgung des Gerätes selbst, als auch für die Versorgung der Ausgänge genutzt.
Gerade in engen Dosen ist ein Elektriker dankbar für jede Wago-Klemme, die er einsparen kann. Beim kleinen Bruder Single Switch 2 ist L sogar doppelt ausgeführt, man kann also noch eine weitere Klemme einsparen.
Allerdings werden sich mindestens genauso viele Leute über diese Änderung ärgern, denn ein potenzialfreies Schalten von einem völlig anderen, unabhängigen Stromkreis ist somit mit dem FGS 223 nicht mehr möglich.

Mit den Doppelrelais ersetze ich nach und nach alle normalen Lichtschalter. Auch bei einzelnen Schaltern nehme ich immer die Version mit zwei Relais, da ich auf diese Weise noch einen weiteren Schalter in OpenHAB zur Verfügung habe, um andere Dinge zu steuern. Das heißt, ich kaufe mit jedem Fibaro Doppelrelais auch immer einen Doppelschalter + Doppelwippe passend zu meinem Schalterprogramm mit und ersetze den Einzelschalter durch Doppelschalter.
Das der zweite Ausgang des Relais nicht angeschlossen wird, ist dabei nicht wichtig, denn das Fibaro Relais sendet das Kommando dennoch zur Zentrale, auch wenn keine Last geschaltet wird.

OpenHAB Integration

Da es für den Double Switch 2 noch keinen Eintrag in der Datenbank gab, habe ich zunächst über die Webseite von Chris Jackson einen angelegt. Das hat tatsächlich einige Stunden Arbeit gekostet, denn die Anzahl an Einstellungsmöglichkeiten ist nochmal gestiegen. Möchte man alle Parameter also sauber einpflegen, inklusive Beschreibungstexte, ist hier etwas Zeit notwendig.

Da ich nicht auf einen Export von Chris und eine neue Version des Bindings warten wollte, habe ich kurzerhand die entsprechende XML Datei exportiert und manuell im Z-Wave Binding hinzugefügt.

Nachdem der Aktor mitsamt neuer Doppelwippe verbaut worden war und die neue XML-Datei zur Verfügung stand, konnte der Schalter inkludiert werden. Nachdem zuvor der Controller in den Inclusion Mode gebracht wurde, geschieht dies durch einen Dreifach-Klick auf den ersten der beiden Schalter.

Die Items für die beiden Schalter waren zunächst recht schnell erstellt und sehen folgendermaßen aus:

Switch	OG_MX_Light			"Licht"		<light>			(gLightOG)	{ zwave="31:1:command=SWITCH_BINARY" }
Switch	OG_MX_Switch		"Schalter"	<wallswitch>	(gSwitch)	{ zwave="31:2:command=SWITCH_BINARY" }


Das reicht schon, dann kann man die beiden Schalter von OpenHAB aus bedienen.

Allerdings folgte dann Ernüchterung, denn im Gegensatz zu allen vorherigen Fibaro-Komponenten aktualisierte sich der Status in OpenHAB nicht, wenn die Schalter bedient wurden. Da der zweite Schalter einzig und allein dafür vorgesehen war, in OpenHAB weiterverarbeitet zu werden, hatte ich ein Problem. Die Assoziationen waren zwar korrekt gesetzt, doch es kam kein Statusupdate bei OpenHAB an.

Nach ein wenig Log-Lesen und Recherche war das Problem klar: Der FGS-223 setzt inzwischen auf Multichannel-Assoziationen für mehrere Endpoints, diese werden aber von OpenHAB 1 nicht unterstützt. Da OpenHAB 2 noch nicht so weit ist, musste ich einen Umweg finden. Ich habe relativ viel probiert, z.B. Szenen zu senden, doch auch hier muss man leider zurück stecken, denn auch das CENTRAL_SCENE Command funktioniert in OpenHAB 1 nicht.
Das Problem ist aber lösbar 🙂 Mit Hilfe eines neuen Items und einer Regel klappte das Statusupdate letzten Endes doch noch. Der Switch hat zwei Assoziationsgruppen (2&4), in denen er jeweils den Schalter 1&2 als BASIC-Command senden kann. Glücklicherweise ist der Wert, den er pro Schaltzustand senden kann, einstellbar. Ich habe also die beiden Assoziationsgruppen mit dem Controller assoziiert:

assoc

Darüber hinaus habe ich die Werte, die der Switch beim Betätigen der Schalter sendet, folgendermaßen eingestellt:

  • Schalter 1 AN = 10
  • Schalter 1 AUS = 1
  • Schalter 2 AN = 20
  • Schalter 2 AUS = 2

config

Darüber hinaus habe ich ein neues Item erstellt, damit diese Werte an OpenHAB gesendet werden:

Dimmer	OG_MX_Basic	"Basic"	<light>	{ zwave="31:command=SWITCH_MULTILEVEL,respond_to_basic=true" }

Durch den Typ Dimmer und den Command SWITCH_MULTILEVEL stelle ich sicher, dass ich beliebige Werte empfangen kann. Durch respond_to_basic=true empfange ich auch die Kommandos BASIC.

Nun folgt noch eine Regel, die die entsprechenden Items auf den aktuellen Stand setzt:

rule "Licht Update"
when
	Item OG_MX_Basic received update
then

	if(OG_MX_Basic.state == 1)
		postUpdate(OG_MX_Light, OFF)
	if(OG_MX_Basic.state == 10)
		postUpdate(OG_MX_Light, ON)

	if(OG_MX_Basic.state == 2)
		postUpdate(OG_MX_Switch, OFF)
	if(OG_MX_Basic.state == 20)
		postUpdate(OG_MX_Switch, ON)
end

Voila! Nun werden die Stati der Schalter korrekt aktualisiert, sobald man sie betätigt und man kann nun durch weitere Regeln entsprechend darauf ohne Verzögerung reagieren.

Verbrauchsmessung

Auch hierzu ist zu sagen, dass man mit OpenHAB 1 leider nur den ersten Schalter messen kann. Glücklicherweise reicht das für meine Verhältnisse, da ich an Schalter 2 ja keine Last angeschlossen habe.

Die Items hierzu erstellt man wie üblich:

Number	OG_MX_Light_Power	"Licht - Watt [%.1f W]"		<energy>	(gWatts)	{ zwave="31:1:command=METER,meter_scale=E_W" } 
Number	OG_MX_Light_Energy	"Licht - KWh [%.2f KWh]"	<energy>	(gEnergy)	{ zwave="31:1:command=METER,meter_scale=E_KWh" } 

Fazit

Der FGS-223 ist eine insgesamt gelungene Weiterentwicklung des FGS-222.

Das die Verkabelung in Unterputzdosen einfacher geworden ist, weil man die Phase nicht mehr doppelt anschließen muss, freut meinen Elektriker, allerdings ist es schade, dass man nicht mehr potenzialfrei schalten kann.

Die Weiterentwicklung des Protokolls um Multichannel-Assoziationen ist dem Standard konform und macht auf jeden Fall Sinn, denn es bietet deutlich mehr Möglichkeiten, was direkte Assoziationen angeht – auch wenn Benutzer von OpenHAB 1 nun leider dadurch nach und nach mehr Schwierigkeiten bekommen werden, neue Geräte noch im vollen Funktionsumfang zu nutzen.

Die Verbrauchsmessung ist wie von Fibaro gewohnt einwandfrei und ist ein Feature, auf das viele lange gewartet haben. Einzig, dass die Häufigkeit von Status-Updates immer noch nur in Prozent, und nicht in Watt angegeben werden kann, ist ein kleiner Wermutstropfen für mich persönlich, aber nicht weiter schlimm. Mein Z-Wave Netz hat noch genügend Luft, so dass dort bei Geräten mit Schwankungen auch gerne mal mehr Events verschickt werden dürfen. Da der FGS-223 beide Schalter separat messen kann gilt aber auch hier für OpenHAB 1 Benutzer: Leider geht nur ein Kanal.

Persönliche Meinung zu OpenHAB 2

Da OpenHAB 1, zumindest was das Z-Wave Binding und HABmin angeht, nicht mehr vollständig weiterentwickelt wird (die Entwicklung beschränkt sich auf Fehlerbehebungen und Gerätedatenbank-Updates), sondern sich die Entwicklung auf OpenHAB 2 konzentriert, habe ich mir einmal OpenHAB 2 angesehen und möchte meine Erfahrung weitergeben.

„Persönliche Meinung zu OpenHAB 2“ weiterlesen

OpenHAB und Z-Wave ZME WallC-S Doppelwippen-Schalter

bjDer ZME WallC-S ist ein batteriebetriebener Schalter für die Wandmontage, für den es für einige Schalterprogramme sogar die passenden Blenden zu kaufen gibt. Er ist somit überall platzierbar und fällt im Idealfall gar nicht auf, sondern fügt sich genau passend in das bereits vorhandene Schalterprogramm ein.

„OpenHAB und Z-Wave ZME WallC-S Doppelwippen-Schalter“ weiterlesen